Writing your first Playwright test


Tim Deschryver
Tim Deschryver
timdeschryver.dev
Reading mode

Writing end-to-end (e2e) tests don't need to be hard. Playwright provides a smooth - in my opinion, the best - developer experience, which makes it straightforward to go from nothing to your first e2e test.

You will probably see me putting more content out on playwright, because I'm so enthusiastic about this tool. For now, let's start at the beginning, and let's take a look at the required steps to have your first e2e test in place. This only takes a few minutes!

The setup

Of course, the first step is to install playwright. You can do this manually or you can make it easier by running the npm init playwright command, this also creates a config file in your project.

npm init playwright
Getting started with writing end-to-end tests with Playwright:
Initializing project in '.'
Do you want to use TypeScript or JavaScript? · TypeScript
Where to put your end-to-end tests? · tests
Add a GitHub Actions workflow? (Y/n) · false
Installing Playwright Test (yarn add --dev @playwright/test)…

Included in the generated config, you see the default values of popular options with a link to the docs. This makes it easier to find information about the configuration. While the config speaks for itself, I like to highlight a few points that make me happy.

playwright.config.ts
import type { PlaywrightTestConfig } from '@playwright/test';
import { devices } from '@playwright/test';
/**
* Read environment variables from file.
* https://github.com/motdotla/dotenv
*/
// require('dotenv').config();
/**
* See https://playwright.dev/docs/test-configuration.
*/
const config: PlaywrightTestConfig = {
testDir: './tests',
/* Maximum time one test can run for. */
timeout: 30 * 1000,
expect: {
/**
* Maximum time expect() should wait for the condition to be met.
* For example in `await expect(locator).toHaveText();`
*/
timeout: 5000
},
/* Fail the build on CI if you accidentally left test.only in the source code. */
forbidOnly: !!process.env.CI,
/* Retry on CI only */
retries: process.env.CI ? 2 : 0,
/* Opt out of parallel tests on CI. */
workers: process.env.CI ? 1 : undefined,
/* Reporter to use. See https://playwright.dev/docs/test-reporters */
reporter: 'html',
/* Shared settings for all the projects below. See https://playwright.dev/docs/api/class-testoptions. */
use: {
/* Maximum time each action such as `click()` can take. Defaults to 0 (no limit). */
actionTimeout: 0,
/* Base URL to use in actions like `await page.goto('/')`. */
// baseURL: 'http://localhost:3000',
/* Collect trace when retrying the failed test. See https://playwright.dev/docs/trace-viewer */
trace: 'on-first-retry',
},
/* Configure projects for major browsers */
projects: [
{
name: 'chromium',
use: {
...devices['Desktop Chrome'],
},
},
{
name: 'firefox',
use: {
...devices['Desktop Firefox'],
},
},
],
/* Folder for test artifacts such as screenshots, videos, traces, etc. */
// outputDir: 'test-results/',
/* Run your local dev server before starting the tests */
// webServer: {
// command: 'npm run start',
// port: 3000,
// },
};
export default config;

Besides the above config file, an example test file is also added to the project.

Creating a test

Did you notice that the title is "creating a test" and not "writing a test"? This is because playwright comes with a test generator that writes the test specification for you, you only need to interact with the application.

To create your first time, make sure that the application is running and then run the playwright codegen command.

npx playwright codegen -output tests/flow.spec.ts

This opens up a browser window, and also the playwright inspector GUI tool. When you start to interact with the opened browser, you can see that the inspector writes out the test code for you.
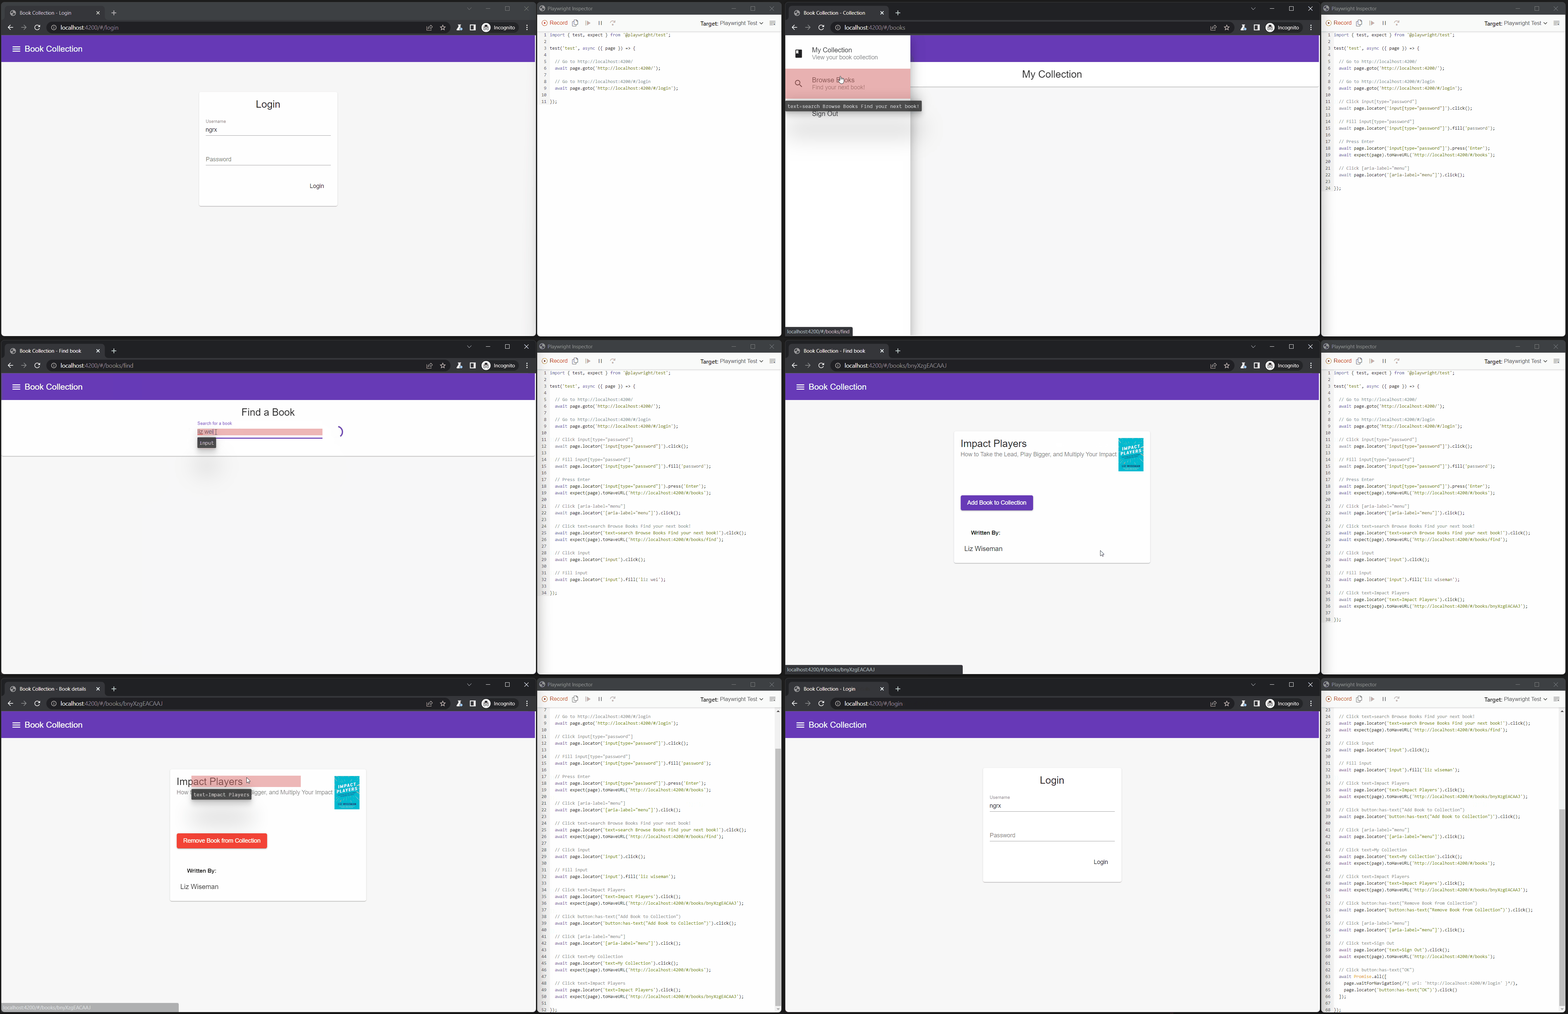
Generating a test with the codegen command while interacting with the application

Close the browser window when you're done and the test is included in the project. As an example, let's take a look at the following test, which is the result of the above GIF.

import { test, expect } from '@playwright/test';
test('test', async ({ page }) => {
// Go to http://localhost:4200/
await page.goto('http://localhost:4200');
// Go to http://localhost:4200/#/login
await page.goto('http://localhost:4200/#/login');
// Click input[type="password"]
await page.locator('input[type="password"]').click();
// Fill input[type="password"]
await page.locator('input[type="password"]').fill('password');
// Press Enter
await page.locator('input[type="password"]').press('Enter');
await expect(page).toHaveURL('http://localhost:4200/#/books');
// Click [aria-label="menu"]
await page.locator('[aria-label="menu"]').click();
// Click text=Browse Books
await page.locator('text=Browse Books').click();
await expect(page).toHaveURL('http://localhost:4200/#/books/find');
// Click input
await page.locator('input').click();
// Fill input
await page.locator('input').fill('liz wiseman');
// Click text=Impact Players
await page.locator('text=Impact Players').click();
await expect(page).toHaveURL('http://localhost:4200/#/books/bnyXzgEACAAJ');
// Click button:has-text("Add Book to Collection")
await page.locator('button:has-text("Add Book to Collection")').click();
// Click [aria-label="menu"]
await page.locator('[aria-label="menu"]').click();
// Click text=My Collection
await page.locator('text=My Collection').click();
await expect(page).toHaveURL('http://localhost:4200/#/books');
// Click text=Impact Players
await page.locator('text=Impact Players').click();
await expect(page).toHaveURL('http://localhost:4200/#/books/bnyXzgEACAAJ');
// Click button:has-text("Remove Book from Collection")
await page.locator('button:has-text("Remove Book from Collection")').click();
// Click [aria-label="menu"]
await page.locator('[aria-label="menu"]').click();
// Click text=Sign Out
await page.locator('text=Sign Out').click();
await expect(page).toHaveURL('http://localhost:4200/#/books');
// Click button:has-text("OK")
await Promise.all([
page.waitForNavigation(/*{ url: 'http://localhost:4200/#/login' }*/),
page.locator('button:has-text("OK")').click(),
]);
});

If you ask me, this is a pretty good test. The element selectors don't rely on css selectors nor on ID selectors. This is good because it makes sure that the test code is robust to future changes, and the flow is easy to understand.

Tweaks to the generated code

Generated test code

The test case is already good, but I'd still like to make a few small changes to make it more compact:

Now, the refactored test looks like this.

import { test, expect } from '@playwright/test';
test('As a user I can search, add and remove books from the collection', async ({ page }) => {
await page.goto('/');
await page.locator('input[type="password"]').fill('password');
await page.locator('input[type="password"]').press('Enter');
// I also like to remove this, but you can leave it in if you'd like
// await expect(page).toHaveURL('/#/books');
await page.locator('[aria-label="menu"]').click();
await page.locator('text=Browse Books').click();
await page.locator('input').fill('liz wiseman');
await page.locator('text=Impact Players').click();
await page.locator('button:has-text("Add Book to Collection")').click();
await page.locator('[aria-label="menu"]').click();
await page.locator('text=My Collection').click();
await page.locator('text=Impact Players').click();
await page.locator('button:has-text("Remove Book from Collection")').click();
await page.locator('[aria-label="menu"]').click();
await page.locator('text=Sign Out').click();
await page.locator('button:has-text("OK")').click();
});

Generated configuration file

The last change is a change to the configuration file. Uncomment the webServer config, and set the start and port options that are applicable to your project. I also like to enable the reuseExistingServer option so that it doesn't start a new application when it's already running.

playwright.config.ts
import type { PlaywrightTestConfig } from '@playwright/test';
import { devices } from '@playwright/test';
/**
* Read environment variables from file.
* https://github.com/motdotla/dotenv
*/
// require('dotenv').config();
/**
* See https://playwright.dev/docs/test-configuration.
*/
const config: PlaywrightTestConfig = {
testDir: './tests',
/* Maximum time one test can run for. */
timeout: 30 * 1000,
expect: {
/**
* Maximum time expect() should wait for the condition to be met.
* For example in `await expect(locator).toHaveText();`
*/
timeout: 5000
},
/* Fail the build on CI if you accidentally left test.only in the source code. */
forbidOnly: !!process.env.CI,
/* Retry on CI only */
retries: process.env.CI ? 2 : 0,
/* Opt out of parallel tests on CI. */
workers: process.env.CI ? 1 : undefined,
/* Reporter to use. See https://playwright.dev/docs/test-reporters */
reporter: 'html',
/* Shared settings for all the projects below. See https://playwright.dev/docs/api/class-testoptions. */
use: {
/* Maximum time each action such as `click()` can take. Defaults to 0 (no limit). */
actionTimeout: 0,
/* Base URL to use in actions like `await page.goto('/')`. */
// baseURL: 'http://localhost:3000',
/* Collect trace when retrying the failed test. See https://playwright.dev/docs/trace-viewer */
trace: 'on-first-retry',
},
/* Configure projects for major browsers */
projects: [
{
name: 'chromium',
use: {
...devices['Desktop Chrome'],
},
},
{
name: 'firefox',
use: {
...devices['Desktop Firefox'],
},
},
],
/* Folder for test artifacts such as screenshots, videos, traces, etc. */
// outputDir: 'test-results/',
/* Run your local dev server before starting the tests */
webServer: {
command: 'npm run start',
port: 4200,
reuseExistingServer: true,
},
};
export default config;

Now, playwright runs the application when you run the npx playwright test command if it isn't served already.

npx playwright test

Resulting in the following output. As you can see below, the test is executed twice. This is because there are two projects defined in the configuration, one for chromium, the other one for firefox.

npx playwright test
Using config at C:\Users\timde\dev\project\playwright.config.ts
Running 2 tests using 2 workers
[WebServer] - Generating browser application bundles...
[WebServer] ✔ Browser application bundle generation complete.
Slow test file: [chromium] › flow.spec.ts (18s)
Slow test file: [firefox] › flow.spec.ts (16s)
Consider splitting slow test files to speed up parallel execution
2 passed (27s)
To open last HTML report run:
npx playwright show-report

And ta-daaa, here's your first playwright test. Nice and simple!

Visual Studio Code Extension

After this post was written, Microsoft also released an official extension for VSCode. With this plugin you can access the most important commands via the command palette. One of these is installing Playwright within your project, and to start a new codegen session. I find this an easier alternative to the npm commands that we've covered in this blog post.
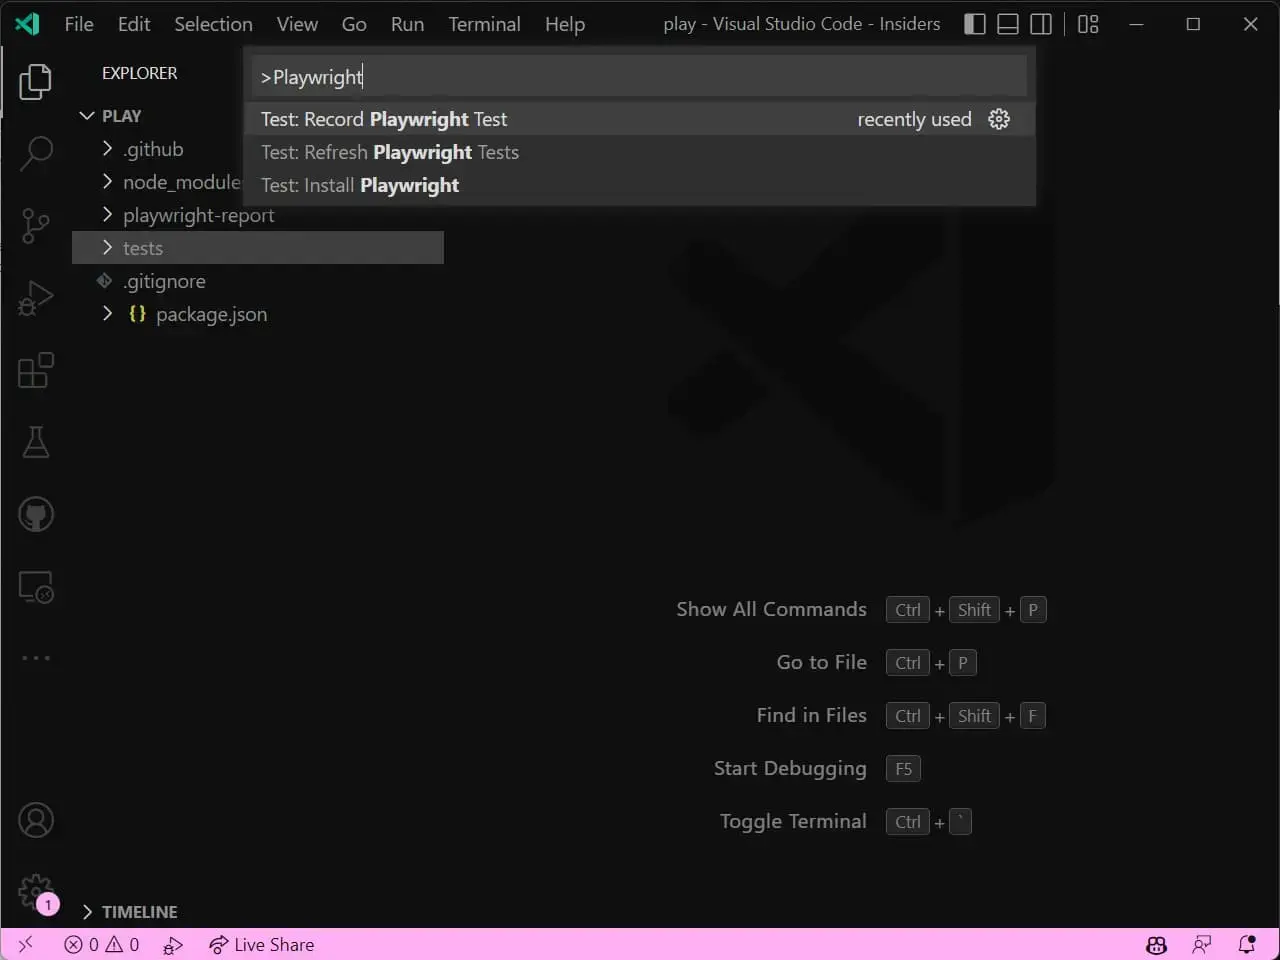
The commands that are available via the command palette.

Besides the commands, the extension also provides a test explorer, and test buttons to run and debug your tests inline. This experience makes it easier to run your tests, and to onboard new team members.

Conclusion

Integrating playwright in your project is straightforward with the npm init playwright command.

You can use the playwright codegen command to generate the test flows while you interact with the application, as a real user would.

While the test looks good and is robust, it's desirable to make a few tweaks to improve the test and make it more compact.

Incoming links

Feel free to update this blog post on GitHub, thanks in advance!

Enjoying the blog?

Support my work

If you enjoyed this post and found it useful, consider supporting my work. It helps me keep creating and sharing content like this. Thank you!